Showing posts with label blog. Show all posts

Wednesday, September 1, 2010

AddThis Analytics and Enabling Clickbacks in your Blogger Blog

I received my first AddThis Analytics Report by e-mail, shown below somewhat compacted for space considerations:


It also showed that StumbleUpon was used by someone in the United States to share this post.

There were no clickbacks. If someone shares my blog post using any of the AddThis buttons, and the recipient visits my site as a result, it’s counted as one clickback. On the chart, it said, “Important: This feature must be enabled.” I had checked the box Enable clickback analysis at the very beginning, but clicked About clickbacks for more information. It said that certain code had to be included, and “addthis_config” must only appear once in the code, but it didn’t define exactly where to place this new code:
This code wasn’t anywhere in my blog’s AddThis code. Hmmmm. So I signed into Blogger and went to Design, Edit HTML. I know I already have a copy of my latest template from a few days ago, but just to be sure, I downloaded the template before proceeding. Expand Widget Templates and found the AddThis code. It made the most sense to me to add this code at the end of the code for the AddThis set of buttons, but before the last bit of code at the end of the entire section. This time, I typed the Begin and End comment lines first, and pasted the code into a line between the two. Here’s the new code and where I placed it within the AddThis code:


Note: You may wish to review the previous post, AddThis Analytics for Share Buttons in your Blogger Blog, for more context in code placement.

I previewed the blog, and everything was working properly: AddThis share buttons were in place and the text of each post had not been removed. I don’t know why the initial checkmark for Enable clickback analysis didn’t add the code, but is should work properly now.

Tuesday, August 31, 2010

AddThis Analytics for Share Buttons in your Blogger Blog

It’s heartening to know that others read and are helped by your articles and blog posts. According to eHow, my articles have about 20,000 unique views. Google indicates a smaller number for my blog. When readers share articles or posts, they do so because of the value of the information or story, and the author benefits because the site is brought to the attention of search engines when such sharing activity occurs.

Thus, many months ago, I had joined such sites as StumbleUpon (SU), Digg and SlashDot, and used them to promote my articles. Ehow facilitated sharing, but I also wanted to add share buttons from these and other sites to my blog. I installed the SU Badge (SUB), and when Google touted their Share Buttons (GSB) with Gmail, Blogger, Twitter, Facebook, and Google Buzz, I incorporated them also. No matter how I tried to vary the code or what guidance I gleaned from the forums, these GSB appeared in a row below the SU Badge (SUB) rather than next to it, which didn’t look right to me. The prospect of individually adding more share buttons seemed too cumbersome.

AddThis, with analytics enabled, would give readers of my blog a wider variety of ways to share with others as well as the convenience of e-mail and printing the post, and it would keep track of sharing activities and provide helpful data to me. Aesthetically, I prefer the AddThis setup over GSB because the former display in color. GSB are shown in shades of gray, and individual buttons only colorize when the cursor hovers.

There are defaults and a host of customization available for AddThis. I endeavored to incorporate AddThis buttons, and remove the redundant SUB and GSB from my posts. I am not an expert in HTML, so this involved lots of trial and error, but I wanted to share with you how I accomplished this.

Start at AddThis and Join Now, to create your account. Scroll down to Select your service and Select a style. Mine is a Blogger blog, so I chose Blogger, and a toolbar, and checked Enable clickback analytics.  Click Get the code, and it takes you to another page.  Click Copy Code and it’s automatically copied to your clipboard.  Log into your Blogger blog. I’m using the old layout, so from the Dashboard, click Design, then Edit HTML and check Expand Widget Templates.

Always download the template before editing. It just takes a moment, and will save you time and aggravation if you make an error. An additional helpful step is to save a text file of the expanded template (Select All > Copy > Paste into a new document) to make editing easier. I add different types OF emphasis and color for newly inserted code to make it stand out, and I place a note about the new code on the first page of the template document—its name, color of text and on what page it is found—and incorporate the code’s name into the document’s name to make it easier to find the document with a certain new code, for example: Template-08-30-2010-AddThis.doc.

The AddThis code must follow <“div class=’post-footer’"> [Note: quotes are added to lines of code so they will be displayed in the blog: otherwise, the website treats them like any other HTML code and hides them from view.]. Using Edit > Find in the text template of my blog, the line was located near the top of page 14, which appears to be not quite halfway through the template.

From the approximate location of the line of code in my template document, I was able to find it in the corresponding area of the expanded template, pasted the code—which was copied to my clipboard from the website, NOT from a template document—clicked Save and was pleased to see no errors when viewing the blog. Note that whenever you copy code from a Word document, lots of unwanted code comes along, too, so paste the code into a text file or a Writer file from OpenOffice.org, and copy again from there to paste into the template.

Time to get rid of the SUB and GSB. I wasn’t exactly sure where their code ends and the rest of the template continues: I had inserted <"!-- STUMBLEUPON BADGE BEGIN -->" and <"!-- GOOGLE SHARE BUTTONS BEGIN -->" at the beginning of each (I thought), but nothing at the end.
Two lessons learned: Always insert an end comment so there will be no question where the code ends;
When you find the existing code after which new code is to be added, add the “begin” comment AFTER that line of code.

As I said, don’t forget to save the template before you make any changes, no matter how small! I saved the template, and then deleted the code AFTER my BEGIN comments for SUB and GSB (to leave place markers, just in case), but did not save the template. The preview of the blog showed that the whole body of text was gone. Uh oh.
I returned to the template and made several alterations in the code, but the text of each blog post was still missing.  After making so many edits, I wasn’t sure how much code belonged to SUB and GSB. Remember how I said at the beginning that one should always download the full template before editing? To the rescue! I now uploaded the template that has AddThis installed AND shows the body of text. Whew. The other solution would be to make absolutely certain when you last saved the template and what the blog looked like at the time: if you haven’t saved it since making several edits, you can Clear Edits, which will remove all edits back to the time the template was saved—not back to the very beginning when you initially designed your blog!

After successfully inserting AddThis and correctly removing the SUB and GSB (after hours of trial and error—I did say I’m not an expert in HTML), here’s what the section of code looks like:

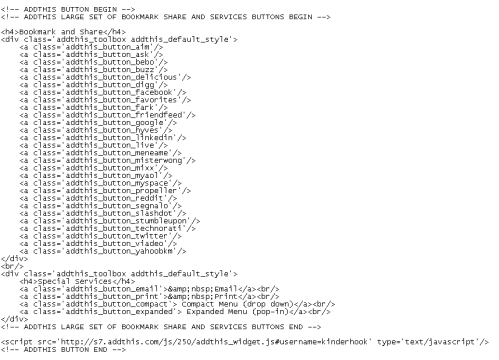
I left the comment lines in place for now: in case you want to insert the SUB and/or GSB, the exact locations (and vital lines of blog code to keep) are clear.

I wondered what types of alterations were possible within AddThis, so I went to Customizing AddThis  and decided on AddThis Toolbox and Choosing your Destinations for a large assortment of share buttons. Because I found out about most of these sites from seeing their share buttons on others’ sites or articles, perhaps my readers will be introduced to new destinations and be interested to join one or more.

AddThis only gave part of the code, down to the last “/div.”  I changed Destinations to Bookmark and Share. Here’s the full code as it must be inserted, with comments:
Notice that you still need the last bit of the default AddThis code at the end of the section.

The option to e-mail was now presented twice at the end of each post—under Special Services (the section just completed) and again above Links to this post. I wanted to keep the e-mail button that is part of AddThis analytics, and remove the latter, which had been set up in Blogger. This is easily accomplished. Sign into your Blogger blog, click on the Page Elements tab, just to the left of the Edit HTML tab. In the box labeled Blog Posts, click Edit, which causes Configure Blog Posts to pop up. Here, I unchecked Show Email Post Links. Beneath that, the option to Show Share Buttons refers to GSB, not AddThis Share Buttons, so I unchecked that as well (just for neatness, because I’d already removed GSB’s code), and clicked Save at the bottom of the pop-up.


Finished! AddThis Share Buttons have been added, previous—now extraneous—buttons have been removed, and the blog correctly displays as intended.

Tuesday, August 3, 2010

Google AdSense for Search--Upgrading to the New and Improved Search Engine

A recent article in WebProNews reported that Google will be retiring its current version of AdSense for Search in just a few months, and a new, enhanced version is now available. Rather than hang onto the old, I decided to perform the upgrade now. Let’s go through the steps together.

Sign into your Google AdSense account using the old interface. To verify that you have the old version: see on the upper right, after the time of your last log in, “Try the new AdSense interface (beta)” in red type. Instead, if you see “Return to old AdSense interface,” obviously you have the new interface. I couldn’t find the right place to proceed with the new interface, so if you have it, click to return to the old version.

In the old interface, click on the second tab, “AdSense Setup” and go down to the second product and click:

AdSense for Search Improved!
“Offer your users site search or web search while earning revenue from ads relevant to their search terms.”

For Search Type, I chose “Only sites I select” and entered this blog’s URL to the box “Selected sites.” I skipped the “Optional Keywords,” thinking that they’re already listed at the bottom of each post.

“More options” defaults were quickly verified: English language, West European Latin-1 (ISO-8859-1) encoding, United States for country, and clicked “Automatically create a new channel” so the drop down box says “No channel selected.” Safe search applies to web searches, not searches of this site, but I made sure it was checked anyway because I never want to see or endorse “sites and web pages containing adult themed and explicit sexual content.” Continue.

I selected the search box with the watermark and kept the text box length at 31 characters. Continue.

As I write, I’ve been walking through this process again (this time adding a permitted second custom search box) so I can avoid any errors of recall. Now that we're at the point where there’s a choice for the opening of search results, I think but am not certain I chose “Google in the same window.” I recall reading somewhere that Blogger doesn’t allow search results to be displayed in the site itself. Unfortunately, I cannot check where search results will be displayed by going to the newly installed box, doing a search and seeing what happens because I think this violates the Terms of Service.

For “Ad Location” I chose “top and right” (this particular Blogger template doesn't allow ads or gadgets on the left side) and think I didn’t change the palettes from that which was displayed. Next, continue to “Get Search Code.” Be sure to check the box after reading the additional terms, and enter a name for your new search engine. Mine wasn’t very creative—“Our Own Search Engine”—but the given name doesn’t display.

Next, click “Submit and Get Code.” (This time, for hours I repeatedly got “The page at https://www.google.com/ says: Error while trying to save your AdSense for Search settings. Please try again later.”)* Anyway, the instructions are to copy and paste the personalized code in the page where you want the search engine to display.

Back in Blogger, from the dashboard I went to “Design” and then “Edit HTML” and checked “Expand Widget Templates”—until I realized I had no clue where to find the correct place in the code to paste the search engine code so that it would appear where I wanted it, along the right column of the blog, near the top. So, under “Design” I went to “Page Elements” and clicked an “Add a Gadget” box along the right column. From there, I chose “HTML/Java Script,” pasted the search engine code into the large box, left the “Title” box blank, and saved it.  That works fine, but later I went back and added a title for clarity: "Search this Blog."

Because I didn’t want the search box at the very top of the list, while still in “Page Elements” I moved the new search box by clicking and holding it, moving it underneath the next box in line, and releasing the mouse button when the box was in the new place, second in the column. A blank “Add a Gadget” box cannot be moved out of its position; only after a gadget has been added to the box. Click the orange button “Save,” which is in line with “Add and Arrange Page Elements” and to the right of blue “Preview” and “Clear Edits” buttons.

Go ahead and “Preview” or “View” (which is located up on the dashboard) the blog, and you’ll see the new search box right where you placed it. Here, notice my two new AdSense for Search boxes: "Search this Blog" and "Search the Web."  If only all website changes could be completed this easily!

~~
* Eventually, the code went through and I added it to an HTML/JavaScript gadget. Another roadblock:

 "We're sorry, but we were unable to complete your request. When reporting this error to Blogger Support or on the Blogger Help Group, please:
• Describe what you were doing when you got this error.
• Provide the following error code and additional information:  bX-2myth2
Additional information:
blogID: 975288774251564062
host: www.blogger.com
uri: /rearrange

"This information will help us to track down your specific problem and fix it! We apologize for the inconvenience.

"See if anyone else is having the same problem: Search the Blogger Help Group for bX-2myth2.  If you don't get any results for that search, you can start a new topic. Please make sure to mention bX-2myth2 in your message."

I looked through Blogger support and learned that there’s no particular meaning to Blogger error codes--didn't we all suspect this?-- and that clearing the cache might help. To do this in Internet Explorer, go to Tools > Internet Options > General > Browsing History > Delete and then check "Temporary
Internet files" and "Cookies."

After this, I closed and reopened the browser and repeated the steps for a new web search box.  Success.  However, as you can see, there’s no watermark in the search box, and nothing to show that it’s powered by Google.